21 May 2015

Cold Cats: Late War German Armour in the Snow

Cold Cats: Tigers and Panthers in the in the Snow

Some WIP photos (Still a fair wack of work to be done on them):


Following on from my post on the Hinterhalt (Ambush) Camo used in the Battle of the Bulge and the Battle for Germany, my thoughts swung to the conflict on the Eastern Front.

My proctrastination box delivered more Panzers in need of the brush. Tigers and Panthers came out.


The Heavy Tigers with their Begleit zug of Medium Panthers move out. 
The Russians have been sighted!


Panthers from 3 different 1/72 plastic model producers, and 3 different models (Ausfuhrungs). 
Italeri (L) and centre, Airfix 2nd from left and unknown manufacturer at centre. The Tigers are all from Italeri

I noted the 3 different exhaust configurations on the models, giving a hint that they were from differen production series. (apart from the driver, gun mantlets and commanders hatch configuration differences)

You may also notice that one Panther is slightly smaller - 1/76 I suspect, Airfix's ongoing cardinal sin, selling 1/76 as 1/72 ! It also happens to be the early (Ausf. D model) as used at Kursk. (2nd from left) The central model is an Ausf. A model, and the rest late war Ausf. G models, equipped with flame dampers for night operations, as in the Battle of the Bulge

Unusual picture of a dual exhaust, as seen in A Ausfuhrung (series), with flame dampers. 
Presumably this Panther A survived to late in the war. The series numbers were designated from Ausf. D to A the G, not alphabetically. 

 photo PantherDZimmeritJackBrackets04.jpg

Early (D) model exhaust configuration


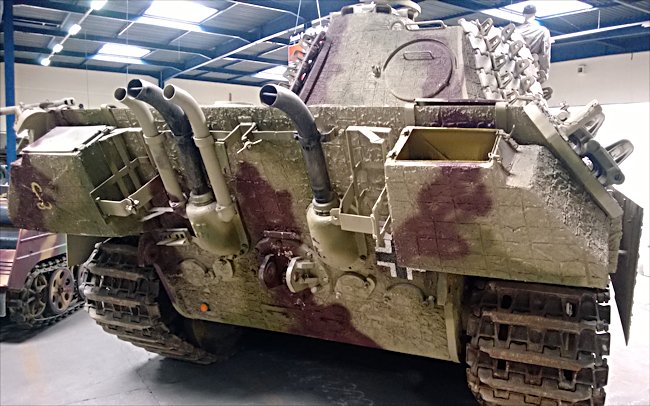
Ausf. A configuration


Ausf G without flame dampers


First production flame damper (Large bore curved)


Final production Ausf. G flame dampers (Cylindrical)
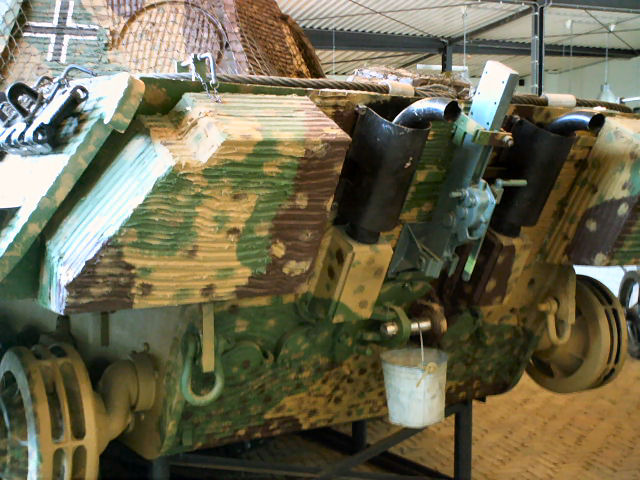
This photograph also shows the crew compartment heater which was installed on the last production models.Some late models also carried infra-red sighting gear for night operations


Crew compartment heater attached to air intake on a knocked out Panther. These were not made in the M.A.N factory, but were assembled elsewhere and fitted in the last stages of production. This modification was evident on Panthers in the Ardennes and Wacht am Rhein.


My infantry are all set on autumn bases, some with a light dusting of snow terrain, so they can be used in late summer, autumn, winter or early spring. For a winter game I would need appropriate armour though.

My attention was drawn to one tank in my collection in particular that was a hand-me-down. It was painted in honey-comb grey pattern, almost reminiscent of WW1 disruptive  camo schemes, but less garish. It was based on the early to mid-war dunkelgrau paint schemes, with the occasional dark blue and green bit thrown in. I decided to give the Panzer force a similar look.


You can almost see the snow flying in this snap.


Weathering dust winterisation of a mottled PzKfw V Panther 

I base coated the Tigers and Panthers in German Grey (Dunkel/Panzer Grau) and applied the honeycomb in Rain Grey freehand. I rather liked the look of the end-result, without filling in any of the honeycomb bits. It looked rather like hand-applied white-wash,  hurriedly brushed on in the field (albeit with a little finesse)


88s swing to meet the enemy...

Next I decided to winterise the tanks. Tried two techniques, one being Humbrol's Winter pigment dusted on with a brush, and the other Spraypaint. The latter gave mixed results, mostly due to a malfunctioning, nozzle, leaving me more that just a bit miffed. That would teach me to be too lazy to clean the airbrush. The paint job was almost completely ruined. So a-weatherising, there we go...


Russian medium Tanks T34s await the attack. Obr 41s, 43s and T34-85s


Supported by some Su-76 tank destroyers


Pzkfw Vs in Battle of the Bulge Hinterhalt for comparison

4 May 2015

Chunuk Bair ANZAC Diorama finally opens. A first look at the NZ Room

ANZAC Diorama and New Zealand Room finally opened

After many delays and much anticipation the New Zealand Room and the Chunuk Bair Diorama at the Dominion Museum (National War Memorial in Wellington) finally opened its door to the public today.


Opening of "Gallipoli: the New Zealand Story in Colour" (Photo  Mark Tantrum - mark tantrum.com)

I was again fortunate enough to share in a behind the scenes look at the New Zealand Room. On Friday night I joined the Campbell clan on a Night at the Museum tour with Rhys Jones. Thank you again Rhys for the wonderful opportunity to see the diorama and the personalised tour you gave us.

Like the rest of the experience, it was just priceless.


The Museum at Night

I will post photos and my impressions on the rest of the exhibition separately, but now the embargo has been lifted; the first look at the NZ Room:

The purpose of this room is to commemorate the New Zealanders' first taste of war, the disastrous WW1 Dardanelles campaign, and specifically the Gallipoli landings, and the attack on Chunuk Bair.

The topography of the terrain was lasercut from actual measurements by Weta Workshop and the terrain and emplacements based on air recce photographs taken in 1915.


Colourised prints of actual WW1 photographs make the distant memories spring to startling life.


The lighting was not yet set up properly when we had our tour. WETA Workshop workers were still installing displays; and my photographs are so-so, anyway, here they are:


Peter Jackson snuck a little cameo of himself into the diorama; Brownie box camera in hand

I have tried to use the historical time-line to explain the battle as seen in the diorama:

The defense of the trenches at Chunuk Bair was the high water mark of the attack, and the diorama depicts the defense of Chunuk Bair on 8-9 August 2015:

The attack, which began on 6 August, was carried out by two columns of the New Zealand Infantry Brigade. They were to meet at Rhododendron Spur and then move up to the summit of Chunuk Bair. It was an ambitious plan that depended on speedy execution.


1. The operation started well – men of the New Zealand Mounted Rifles Brigade and the Maori Contingent successfully cleared the way for the assault columns. But delays meant that the attack on the summit was ordered before all the infantrymen had reached the Spur.


View North towards the Summit  and Apex from the South (Seaward side on the Map): Rhododendron Ridge and NZ  Mounted Rifles and Maori Contingent

2. The Auckland Battalion assaulted first and failed. The commander of the Wellington Battalion, Malone, refused to sacrifice his men in a daylight attack and insisted on waiting until night. Malone was a tough but respected commander from Taranaki who regularly put himself on the line for the welfare of his men. He allegedly told his superior, Brigadier-General Johnston: ‘We are not taking orders from you people… My men are not going to commit suicide.’


NZ Mounted Rifles holding Rhododendron Ridge


Looking South


Malone's command dugout


Colourised photographs bring the events to life


Auckland Rifles digging in after suffering horrendous casualties


The Assault on the summit meets with stiff opposition. 
 Corporal Cyril Bassett hauling telegraph line up the hill.  Under continuous fire Bassett succeeded in laying a telephone line from the old position to the new one on Chunuk Bair. He received the only Victoria Cross awarded to a New Zealander in the Gallipoli campaign. 


Another Cameo - Auckland Rifles: Rhys Jones pressing home the attack 


Malone closer to the summit. He was killed by Allied shells later in the day

The Wellington Battalion took and occupied the summit before dawn on 8 August. With sunrise came a barrage of fire from Turks holding higher ground to the north. 

3. A desperate struggle to hold Chunuk Bair ensued. It was not until after dark that the Otago Battalion and the Wellington Mounted Rifles arrived to reinforce the 70 Wellington Battalion men (out of 760) who were still holding the line. Malone had been killed by an Allied shell at about 5 p.m.


Thousands of Turks attack the summit next morning


The Wellington Rifles repel wave after wave of Ottoman attackers


 4. The New Zealanders were relieved on the night of 9/10 August by 2 British battalions, but these quickly succumbed to a counter-attack led by Mustafa Kemal, who was to become the founding President of Turkey. (http://www.nzhistory.net.nz)

I am proud to have played a small part in producing this awesome diorama. It is dedicated to the memory of the men who paid the highest price in Gallipoli. Lest we forget.


Rhododendron Ridge today, looking towards the summit


 For more (and better quality pictures) see the Roly Hermans' official blog page: ANZAC DIORAMA

and Fern and Sam's Napalm Elf and Rebel Scum