Showing posts with label Ouistreham. Show all posts

22 May 2014

D-Day Landings Part 3: Ouistreham Harbour, Riva Bella Casino and German Observation tower

 D-Day Landings Part 3: Ouistreham Harbour, Riva Bella Casino and German Battery Observation tower

The French Commando Kieffer attempts to liberate Ouistreham

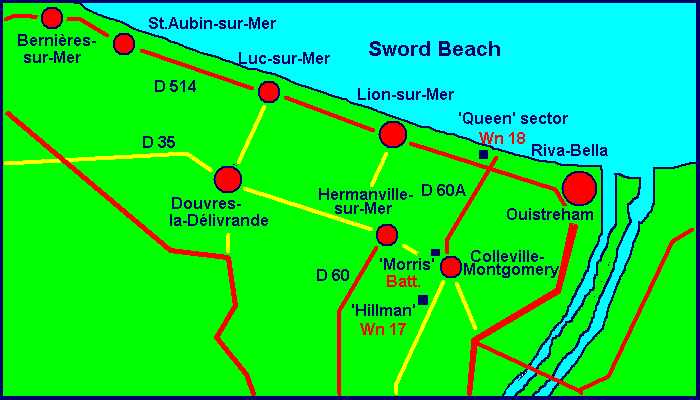
Ouistreham was a town situated just behind Riva Bella on the Normandy coast; close to the mouth of the River Orne and the Caen Canal. The area was strongly defended in 1944. 

Historical background: 177 Frenchmen of the 1st Batallion of Fusiliers Marins Commandos landed there on 6 June 1944. The French under Commandant Kieffer were integrated into the N°4 British Royal Marine Commandos. They were granted the honour to set foot on Normandy soil in the first wave. The Commandos left about forty casualties on the beach and moved inland. Commandant Kieffer was wounded but went on with his troops. 


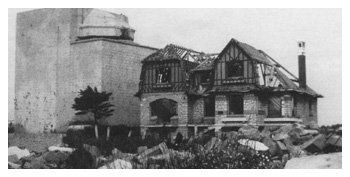
Troop 1 suffered heavy losses in front of the casino strong-point. They eventually obtained support of a tank of the 13/18th Hussars of the 27th Armoured Brigade. The German blockhouse was neutralized and  Ouistreham was liberated at the end of the morning. The Germans in the Artillery Observation tower next door survived completely surrounded and barricaded in for 3 days before surrendering to a platoon of Royal Engineers. Ouistreham was a small coastal harbour, but none the less useful to the Allies, as it was the gateway to the road to Caen, and the Orne river and canal.


Ouistreham harbour on the morning of 6 June 1944. Defended by a garrison of 716.er Inf. Div Germans, an HMG pillbox, twin 20mm guns on the harbour wall. A Quad Vierling AA gun was provided to protect against air attack. When the Germans saw the allied invasion force on the horizon a HMG on a tripod was also brought up and mounted on the harbour wall outside the harbour master's office and the water tank. The exposed fuel dump was particularly vulnerable to attack.

Our Alternate Battle:
Allied attack goes first. Preliminary bombardment spared the harbour, and concentrated on the Merville battery further up the coast and inland from OPuistreham. The commandos decided to split their forces, and attempt a sea-borne landing and assault on the harbour with half their force, while the balance landed in the second wave on Lion-sur-Mer beach, and attacked the Casino Riva Bella and the Artillery Bunker-tower there. Keiffer commanded that assault himself. The battle is descibed in the preceeding post. 

Unlike the real battle, where Kieffer was only wounded, he was killed outright during the assault, and the Sherman tank reinforcements did not have any significant effect on the entrenched defenders. This had a serious knock-on effect for the Commando commanders, as half their forces were trapped on the beach at Lion-sur-Mer, and could not out-flank the German defenders as they had  planned. 

Wild Cards: Both generals rolled +1 on their reinforcement rolls.

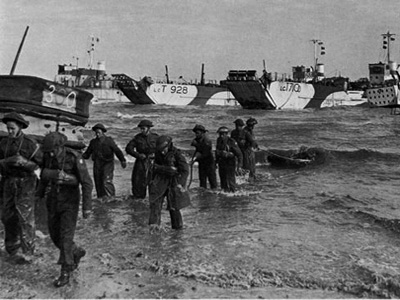
Well before dawn allied bombers and transporters droned overhead, laden with Allied Airborne troops, on their way to the bridges over the Orne river and canal. The commando's huddled against the sea spray in their landing craft. A number of them slipped quietly into their cockleshell canoes, and started paddling towards the harbour, a dark silhoette ahead of them. Searchlights swept back and forth across the harbour approaches. The plan was to capture the harbour and link up with the Paratroopers who were dropping down behind enemy lines.

photo Roly Hermans

A RAF rescue launch dropped a number of the advance party near the harbour entrance. They slipped silently onto the shore under the cover of darkness. The sappers set about cutting through the barbed wire defenses. Then the probing Nazi searchlights found them...

A siren wailed, and simultaneously the German MG gunners opened fire, a sound almost like canvas ripping, but far more deadly: MG 42's firing! The commando's hit the deck in an attempt to make themselves as small as possible. The element of surprise was lost. Even though the Germans had started pinned down, the platoon that had started making the assault was in serious trouble.

Turn 1: The platoons of Commandos that have successfully landed start attacking the pill-box and 20mm gun emplacements. The German defenses are well thought out, and the commandos are caught in a murderous cross-fire. Rank after rank fall to the Heer machine gunners, specifically picking out command platoons with unerring accuracy. (Or shall I say lucky rolls) The commando officers appeared to be particularly suicidal on the day. Commandos do not avail of the British bulldog rule, but can act independent teams. Small consolation. Not a single German unit failed their pinning test, and the Commando forces took heavy casualties. Only a single platoon was left standing by the end of the German 1st round. 

(another Roly photo)
View of the harbour with defenses, the Orne river to the right and the Canal to the left. In the distance a Horsa glider and the Canal bridge, fated eventually to become known for ever as "Pegasus bridge+, after the emblem of the 6th Airborne. German reinforcements are making their way to the harbour at left. Barely visible at the far left is the Merville battery.

Turn 2 and 3 saw wave after wave of commandos in landing craft and canoes land. The second wave was able to get a gammon bomb through the gunner's slit in the pillbox, and silenced it. The link-up with the troops from Lion-sur-Mer did not happen, and the German defenders did not have to defend their flank as well as the frontal assault they now faced.

As a result the second wave was also caught in the cross-fire. Several platoons were able to make it into the open area beyond the harbour wall defenses. To their dismay they walked straight into 3 platoons of infantry hard up against the perimeter wall, thoroughly dug in! With disbelief they saw the 4-barreled antiaircraft level it's 20mm cannons at them. Then they were no more.

As dusk fell, the commando attack petered out. A single canoe made it's way back to the RAF rescue launch. The waves continued to lap up against the shore as the evening tide came in. It was 12 hours since the attack had begun. Not an inch of ground gained.

The German commander walked onto the harbour wall, and looked down on the heaps of khaki clad bodies piled below. "Brave men", he thought, "A full frontal assault! Foolish. Did they not learn anything from Dieppe? " 

The last blog post on this battle, the Airborne landings will follow Mon Petit Generals!


21 May 2014

D-Day Landings Part 2: Sword Beach Re-fought: Lion-sur-Mer and Hermanville-sur-Mer

D-Day Landings Part 2: Sword Beach Re-fought: 

Lion-sur-Mer and Hermanville-sur-Mer


La ville d' Lion Sur Mer, Hermanville-sur-Mer farms in the distance.
L to R: Artillery observation tower/bunker, the Riva Bella casino (German HQ)
Dug in 716. Inf.Div Troops, HMG Bunker, HMG Pillbox, LMG dug in
Heer Artiller and Luftwaffe 88mm guns in place.

An uneasy dawn broke over Lion-sur-Mer in Normandy. It is 6 June 1944. English and Americans ships had bombed the area significantly since midnight...

Surely they would not launch an attack in such foul weather. Surely this is just a diversion, as everyone knows their attack will come at the Pas de Calais...

At 0300, the Allied air forces bombarded the German beach defenses for the final time before the amphibious invasion. A few hours later, British warships bombarded German gun batteries and other strong-points along Sword Beach. At daybreak, British destroyers closed in and fired at short range. At 05.10 hours, Royal Air Force aircraft laid a smoke screen to shield the invasion force, but the smokescreen was used by boats of the German 5th Torpedo Boat Flotilla to attack, firing 15 torpedoes and scoring one hit, sinking the destroyer Svennert. 

At 05.30, soldiers began embarking landing craft. At 0600, LCA landing craft began sailing for Queen Red and Queen White sectors, joined by waves of various landing craft every few minutes. 


Sword Beach from the Air at low tide

Wildcards: Both teams rolled an extra +1 to reinforcement rolls for armour.
The winner would be the Army that held the objectives (Bella Riva Casino/Observation tower) and Road to Caen.

Turn 1: 

As the landing craft closed, LCT(R) vessels fired a total of 1,064 5-inch rockets, knocking out some beach obstacles, 2 troop units of infantry. Shortly after, at the range of 7,000 yards, self-propelled guns of the UK 3rd Division began to fire from their vessels to knock out beach obstacles. 

At the distance of 5,000 yard to the beach, 40 duplex-drive Sherman tanks of the UK 13th/18th Hussars were launched; historically 31 of them would make it to the beach successfully. By this point, all German guns were firing at the landing craft, and the Allied formation began to break up...
The D-day assault on Sword Beach was in full swing 


First Wave of Allied troops land: 2nd East Yorks Engineers/sappers supported by DD M4 Shermans
Several Higgins boats have already refloated 
DUKWs bring in weapons teams bearing mortars in the 3rd wave.

07.25 hours, the infantry arrived on the beach, which quickly attracted fire from machine guns and other small arms. The UK 2nd East Yorkshire sappers which landed on Queen Red sector, experienced a tough fight as they attempted to dash across an area bombarded by 88-millimeter and 75-millimeter guns inland, while being raked by HMG and LMG machine gun fire. 

The Germans returned fire in their turn, and picked off a surprising number of English command teams. It may be due to the fact that many wore their officer's caps and carried swagger sticks, making them easily identifiable to the German gunners.

Turn 2: 
Shortly behind the initial wave were 24 landing craft carrying British Royal Marine commandos. The commandos landed on the extreme western end of Queen White sector and moved toward the German strong-point at Lion-sur-Mer, which would serve as the link-up between Sword and Juno Beaches. The first target of the commandos was the casino at Riva Bella, which had been turned into a formidable fortress of interlocking bunkers, trenches, wire entanglements, and minefields, and housed the German HQ

Leading the attack on Riva Bella was French Captain Phillippe Kieffer, commanding officer of two groups of French commandos attached to the British Royal Marines, thus making this attack a purely French effort. Kieffer attacked Riva Bella at two locations from the rear with small arms, personal anti-tank weapons, and grenades, but the commandos were soon stalled by the German defenses proving to be difficult for Allied weapons to penetrate, with well dug in infantry. (Objective 1)


Kieffer found a duplex-drive Sherman medium tank, and persuaded the tank to assist the assault on Riva Bella. The Sherman tank failed to knocked out the defenses, trapping the commandos on the beach, exposed to a cross-fire between two pill-boxes. (Contrary to the real history)


To the east, British commandos attacked the German gun battery at the mouth of River Orne from the sea, in an attempt as ill-fated as the Dieppe raid. (More about that in a different post.) 

Machine gun nests, tank traps and minefields protected the battery. In the center of the battery was a 56-foot high concrete tower that housed the control and ranging equipment for the coastal guns; though not a defensive structure, German troops made effective use of the tower's height to observe British movements to relay down to the defenders on the ground, meanwhile throwing grenades down at close-by British commandos as opportunities presented.This gun battery, with its concrete tower, would remain in German control for a days to come. (Objective 1)


The German battery at Hermanville-sur-Mer received the co-ordinates for the beaches from the observation tower, but to their dismay found that their shells fell short, and failed to inflict any damage on the enemy.

Only the coastal defense 88mm and 75 mm guns were able to put some Shermans out of action and pin the sappers down. A bitter lesson learnt - make sure your artillery is within striking range of the target!


Heer Artillery: LeFH18 with 20mm Quad Vierling mounted on half-track: The initial landings were out of their range, and they could but idly wait for Allied forces to move to within striking range.


Second Wave: More Sappers and LCTs disgorging  M4 Shermans. These were eventually successful in destroying the pill-boxes, but not the concrete enfilade bunker. A high cost was pain by the sapper units, particularly amongst their officers. Thank goodness for the British Bulldog rule and the good ol' NCOs. Lesser men would have crumbled.


DD Shermans come ashore as more M4s with Firefly VC Command tanks land from LCTs

Turn 3 saw yet more troops land, this time with mortars. The heavy weapons proceeded to rain destruction on the 716.Inf Div troops, who took shelter, and survived the onslaught dug into their trenches. A Typhoon flight took out numbers with their rockets in 2 separate attacks in turn 1 and 3, but were apparently intercepted by the Luftwaffe in turn 2. There was no German aircraft to be seen whatsoever. The Allies had complete air superiority. The huddled troops in the embankments paid the price. But there was no-where to run too. Feldmarschall Rommel's displeasure would be worse than any Tommy's bayonet!

Turn 2 saw Oberst Leutnant Fischer's 21.er Pz Div Stugs arrive. They barrelled down the road towards Lion-sur-Mer, but diverted towards Ouistreham when the radio message was received that the bridges and lock over the Orne River was under attack from Allied airborne and commando troops. 

The defense of the coastal towns was thus left to the gun emplacements and dug in infantry. 
Word had also been received from the east, where it Pz IVs were ready to engage the enemy.  

Photo Roly Hermans
Typhoons unleashing 60 lb rockets on the dug in 716. Inf. Div: 
A payload equal to that of a Lancaster bomber! 
The 21.er Pz Div Stug Abteilung decided to detour to try and counter the Paratroop attack on the Orne river. The commando teams landed to the left were decimated by accurate and sustained Spandau fire from the pillboxes, and failed to reach their objective, despite assistance from the DD Shermans
 

Herr General der Infanterie Division inspecting
 the 21.er Panzer Div. Stug Abteilung as they arrive on the table


More Shermans land as LeFH 18 artillery shells fall harmlessly in the water

All too soon dusk fell, and we had to call and end to the battle. The invasion forces were still firmly trapped on the beach. Mine fields, tank traps and barbed wire had prevented the tanks from making inroads, and the sappers had failed to clear the defenses. 
The Commandos were left leaderless, with Kieffer himself succumbing on the sand. 

Both objectives were still in German hands. Had the battle had continued for more turns the tide would eventually have turned, but in this alternative battle the German forces were the victors.

More photos:


11 May 2014

D-Day at Last: Kapiti Wargames Club Open Day

D-Day: Sword Beach at Kapiti Wargames Club Open Day 2014.


We are barely 3 weeks out from the 70th anniversary of the D-Day Landings on 6 June 2014.

I have been preparing for several months for a large-scale 20mm Flames of War game. The boards are painted and flocked, most of the troops, armour and planes ready, bar some national markings that got left off. Anyhow we loaded the boards and miniatures and headed off to Paraparaumu. Unfortunalely quite a few of our Generals, experienced and otherwise had to pull out either due to business or family commitments.

Les could only make it for the opening volleys of the game, and had to leave early. Others could not make it at all. Suitable replacements were found, never the less, and a great day of gaming was had by all!

Protagonists at Sword Beach
Allied forces attacking Gold, Juno, and Sword Beaches faced

German units of LXXXIV Corps under General der Artillerie Erich Marcks:

716th Infanterie-Division Logo.svg

                                               716.er Inf Div. Insignia              21.er Pz Div Insignia
  • 716th (Static) Infantry Division under Generalleutnant Wilhelm Richter. At 7,000 troops, the division was significantly understrength, and included Ost Truppen, Soviet PoWs who elected to serve in German Uniform rather than go to PoW camps.
  • 736th Infantry Regiment
  • 1716th Artillery Regiment
  • 21st Panzer Division under Generalmajor Edgar Feuchtinger: Included 146 tanks and 50 assault guns, plus supporting infantry and artillery.

British and Canadian zones (The latter landed at Colville, ignored for purposes of this game)

Royal Marines Commandos attached to 3rd Infantry Division move inland from Sword Beach, 6 June 1944
Commander, Second Army (Britain and Canada): Lieutenant General Sir Miles Dempsey

Overall, the Second Army contingent consisted of 83,115 men, 61,715 of them British. The nominally British air and naval support units included a large number of personnel from Allied nations, including several RAF squadrons manned almost exclusively by overseas air crew.

                                                     
                                                       3rd Infantry Corps Insignia
  • British I Corps, commanded by Lieutenant General John Crocker
  • British 3rd Infantry Division: Major General Tom Rennie
  • British 6th Airborne Division: Major General R.N. Gale
  • 79th Armoured Division: Major General Percy Hobart


Facing the landing beaches from the sea: Ouistreham, Lion-sur Mer and farms outside Hermanville-sur-mer in the Distance. The German HQ is situated in the Casino Riva Bella, with the artillery observation tower at left (Allied and German objective) LeFH 18 battery at Hermanville, protected by Flak 38 and Pak 40, Vierling Flak on Halftrack. The road from Hermanville runs down the centre, with the road to Merville leading off the board to the left, Luc -sur-Mer to the right. Heavy MGs on Pillbox and bunker


Luc-sur-Mer, with artillery emplacement (88mm) and 75mm turret bunker (Right), Ost truppen dug in (The weakest link) Heavy MG in pillbox. Road to Lion-sur-Mer and Ouistreham to left, Colville to right.
Nebelwerfer rocket artillery in the fields beyong Luc-sur-Mer (substituting for Wurframen static rockets, as I have none), again supported by an 88 and a 37mm Flak on a halftrack.


Ouistreham harbour and fuel Deport (Objective 2) Protected by Light (bipod) and heavy (Pillbox) MG, 20mm twin AA gun  and Flak Vierling, Ost Truppen of 716 Div.


Rockets at the ready, some Ost Truppen to protect the artillery, and the Luftwaffe half-heartedly manning their 88mm Flak


Heer (Wehrmacht) Artillery. They accounted for more Allied casualties in WW2 than all the Tiger tanks put together. In this case LeFH18 (Light Field Howitzers) 105 mm guns.


The Guns of Merville Battery: Objective 3: 6th Airborne: Parachute brigade


Pegasus Bridge (Orne River): Objective 4: 6th Airborne: Air landing Companies 


22nd Dragoons Sappers (Demolition teams) are the first to land


RAF supplying areal support with Hawker Typhoons. Nick, the Supreme Allied commander rains rockets on the dug in Germans of  716. Infaterie Div.


AVRE Bunker-busters, Hobart's "Funnies" arrive at long last to swiftly clear the defenses at Luc-sur-Mer


LCVPs and DUKWs landing more sappers at Lion-sur-Mer. Unfortunately for them within range of the Nebelwerfers and the heavy machine-guns


Stugs of the 21. Panzerdivision arrive via Hermanville en route to Lion-sur-Mer, and Ouistreham


Yours truly deploying the 21.Pz Division Stug platoon


Sherman wade ashore near the Casino


The second wave of Allied Commanders achieve a break-through at Luc-sur-Mer. The Allies suffered an unusually high rate of casualties amongst both commanders and field officers. 
Supreme Commander Nick urging his generals to increased efforts. He ascribed the high rate of loss of field officers to the Germans being instructed to pick out the British officers.


Hobart's funnies, Shermans and Wolverines pouring from assaulting landing craft and into the gap created by the Dragoon Sappers, but too little, too late ?

Strange how games and history often reflect what actually happened given a well written rule set.
The Allies knew that the Germans would be a hard nut to crack!
Full Batrep to follow...


Generals Repose: Nick and Sam havin' a break at the end of the day

9 April 2014

Sword Beach: Ouistreham: The Plot thickens

D-Day Wargaming ahead: Kapiti Wargames Club Open Day

D-day gaming coming up on 10th May 2014:


So I have been plotting and planning on the D-Day gaming ahead. I have drawn up the plan (not to scale) of the game board, with areas representing the actual landing beach, the German Defenses and the villages of Collville -, Luc- and Hermanville-sur-Mer, and the small harbour at Ouistreham, the Orne river and Canal, the Orne river bridge, and the bridge now known as Pegasus Bridge. And the Merville Battery thrown in for good measure.

Historical Background:
Ouistreham was the key to the Allied attack at Sword Beach, as it was the gateway into the Orne, the Caen canal, and the cross-road hub town of Caen. Seizing control of the town would give the Allies a small port (nowhere near the size needed for sustaining supply lines, but useful, none-the-less), and control of the river and canal bridges so as to prevent German armor from hitting their left flank.

The Germans, needless to say, knew how important the town could be and made preparations.  The casino was retrofitted with a bunker in the basement and gun that could hit ships at sea as well as targets closer in. Other fortifications went in as well, and in a very flat area, a towering bunker designed to withstand bombs, artillery fire, and even gas/chemical attacks, was built behind an existing house to help disguise it a bit.  This was not a gun bunker - it was far more dangerous than that.  It was an observation bunker with a very accurate rangefinder for the time.


Keiffer Commando forces in house-to-house fighting in the advance towards Bella Riva. 
Duplex Drive Sherman leading the spear-head

Not only did the bunker survive the day, but the story of how it fell brings a smile to the face.  On D-Day, the bunker was bypassed after troops came under machine gun fire and grenade attack when approaching it. After the battle the structure fell silent, and it was presumed abandoned. On 9 June 1943, a Lt. Bob Orrell of the Royal Engineers was tasked with assessing and cataloging construction materials left behind in the Ouistreham area by the retreating Germans. On inspection he noted that the bunker was closed up,  and apparently locked from the inside.  He was ordered to investigate further, so he went back with a mobile crane and three assistants.

Observation Bunker 

The door was still locked, so he tried explosives: To no effect. They then tied other means of forcing the door, but finally went back to (more) explosives and succeeded in forcing the door open.

It was then that a voice called down in perfect English that it was "Okay, come on up !"  To which the good Lt. responded that he could not fly, and whoever was up there should come on down.  To his amazement 53 Germans descended and surrendered to a force of one junior officer and his three assistants.

The German HQ housed in the casino was not set back from the water, on a hill, as portrayed in the movie The Longest Day.  It was in fact set effectively on the beach with a ditch/canal in front.  The Keiffer (Free French) Commando forces did indeed take it; and also destroyed it, and today a new casino sits on the site.


One thing to consider about the troops making the beach assault though, is them having to cross as much as  300 meters of wet sand with absolutely no cover of any kind.  Because the invasion was scheduled for a period of extremely low tides, many troops coming in had to charge across up to 300 meters of open beach before hitting the edge of the beach and finding any potential cover.


Some inspiration from fellow gamers: Terrain and toy soldiers (clicky)


We plan to use the FoW rules from the D-Day Minus One and D-Day books, effectively having 3 games in one:

Thus a large table:

Allied Targets:
1. Beach assault, overcome German beach defenses, take the villages, including Oistreham; open the road towards Caen  - Beach Assault rules
2. Commando Assault: Take Ouistreham fishing harbour, knock out  defenses, Casino and  Riva Bella , link up with Airborne assaults at bridges/ Merville Battery - Beach assault or seaborne commando assault rules
3. Airborne Assault: Parachute and glider landings on Pegasus Bridge, Orne River bridge and Merville Battery

German Targets:
1. Prevent Allies from taking Ouistreham and beach (-sur Mer) villages, the German HQ in the Casino Riva Bella ; and establishing a foothold on the continent
2. Protect road to Caen, including bridge access across Orne river and canal
3. Protect Merville Battery

To make things a bit more interesting we have decided to throw in a few historical wildcards. At the beginning of the game we'll roll to see if any specific conditions may affect the way that the game plays out:

Allied Wildcards:
Fortune cards:
  • Successful  preliminary bombarding: Roll D6: On roll of 5 or 6 Allied player gets additional round of preliminary shelling , 3 or 4 re-rolls on fails to wound, 1 or 2 re-roll fails to hit  
  • Mill pond: Weather and tide does not affect landing,  +1 to all rolls caused by weather effects
  • Partisan attack: Place one infantry section within 24 inches, but more than 12 inches away from German infantry troops. These count as being in ambush, Conscripts, fearless
Misfortune cards:
  • Wild weather: Weather and tide affects landing severely,  -1 to all rolls caused by weather effects
  • Beach defenses effective: - Roll D6: On roll of 5 or 6 Allied player has to roll for every landing craft or tank as it gets into the landing zone: A rolls of 1 makes vessel capsize/tank flood, 2  or 3 stranded until next turn (caught up in obstacle but freed, can land cargo next turn); 4 or 5 delayed (can attempt landing again next turn) ,  6 delayed and return to landing ship (sea zone) (can attempt again next turn)  
  • Luftwaffe and Kriegsmarine interception:  Roll D6: 1-3:  Luftwaffe available Roll again- determines level of availability. 4-6;  Kriegsmarine (U and S-boats) Same rule, but can only target landing craft (No extra cost to axis player)
German Wildcards:
Fortune cards:

  • Luftwaffe cover available: Roll to see level of cover (no extra cost)
  • The Fuhrer's Blessing: Rommel takes command (All Axis troop morale +1, to max fearless veteran; Armour support arrives on  D6 Roll: 1-2 (turn 4) 3-4 (turn 3) 5-6 (turn 2)
  • Hitler's Fire-brigade: SS Panzer Division and Panzer Lehr become available D6 1-3 (turn 4) D6 4-6 (turn 3)

Misfortune cards:
  • Partisan attack: Allied player places one infantry section within 24 inches, but more than 12 inches away from German infantry troops. These count as being in ambush, Conscripts, fearless
  • Turncoat Osttruppen: Russian POW troops: First contact: Roll Morale test: D6. Roll for every unit: On roll of 1 surrender without fight, roll of 2: -1 to morale; 3-6 morale per book. German player can motivate using German Oficer, sacrificing one platoon unit a-la- USSR Commisar rules.
  • Caught pants down: All troop morale -1 for first 2 rounds,  Armour support arrives on D6 Roll: 1-2 (turn 4) 3-4 (turn 3) 5-6 (turn 2) German troops cannot make storm trooper moves first 2 turns. 


19 March 2014

D-Day 's a'coming: Kapiti Wargames Club open day

70th Anniversary of the D-Day Landings

We are planning for this year's Kapiti Wargames Club open day in May. I thought it appropriate that we consider doing a D-Day Landing theme this year, being the 70th Anniversary of the event that turned the tide against the Germans in Europe (well, ok, on the Western Front)

 By this time the Battle of Kursk (clicky for last years battle report) had already happened, and the Germans were retreating on the Eastern Front, but still far from beaten.


I'm hoping the Kapiti FoW group will come to the party again, and put on another of their dazzling displays.

My own intent is to re-fight Sword Beach landings, mostly Queen sector, and poss Ouistreham. On looking at the maps of this area I discovered that there was 2 towns embroiled in the battle that carry my name and that of my son; Hermanville-sur-Mer and Luc-sur-Mer. I would appreciate it if anyone had more detailed maps of the German emplacements in this area, specifically the widerstandsnester (strong points).